Barbell Squat Form: A Full Demonstration Guide (Plus the Gear That Makes It Safer)
A proper barbell squat comes down to five checkpoints: bar position, stance, the descent, the bottom, and the drive out. Get those right and the rest of the lift takes care of itself. This guide walks through each step of a barbell squat demonstration, then covers the home-gym gear, rack, bar, plates, belt, and bands, that makes practicing that form safely possible without a commercial gym membership. Every recommendation below is grounded in published specs, live Amazon listing details, and what verified owners consistently report about using this gear for squat training in 2026, not a marketing script.
The gear we'd actually put in a home squat setup
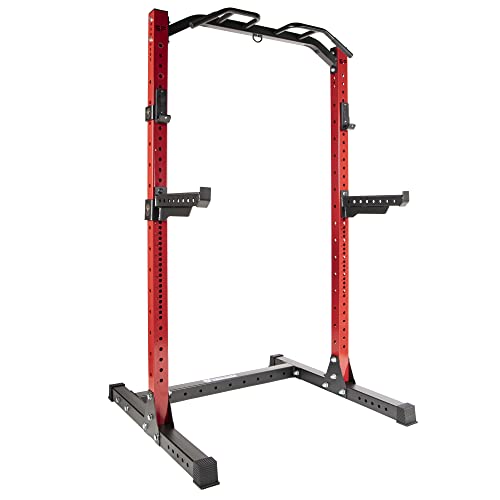
Signature Fitness Power Cage with Pull-Up Bar
Owners consistently report that the J-hooks and safety pins hold steady even under a heavy working set, and the hole spacing is tight enough that you're never guessing which pin to use.
- Sturdy 2x2 steel construction
- Adjustable safety bars for failed reps
- Doubles as a pull-up station
- Needs real floor space and ceiling height
- Assembly takes two people and a couple hours

Yes4All Power Tower Squat Rack
This is the rack we'd recommend to a first-time home lifter, it's not fancy, but the spec sheet and owner reviews back a pipe frame that holds a loaded Olympic bar without wobbling on unracking.
- Much cheaper than a full cage
- Compact footprint
- Easy to bolt down or leave freestanding
- No safety arms on the base model
- Feels less stable above heavier working weights

CAP Barbell 7-Foot Olympic Bar
The listing specifies a knurl depth that owners describe as biting enough on the upper back without tearing up a t-shirt, and reviewers note the sleeves spin smoothly enough that plates settle instead of dragging on the descent.
- Standard 7-foot, 2-inch sleeve Olympic spec
- Good knurl depth for squat grip and back placement
- Fits any standard rack or bench
- Not rated for max-effort powerlifting loads
- Finish will show surface wear over years of use

Synergee Bumper Plates
Owners who've dropped a missed squat rep onto these instead of steel plates report saved floors (and quieter downstairs neighbors), the rubber is described as absorbing impact cleanly.
- Color-coded by weight for quick loading
- Rubber coating protects floors and rack uprights
- Consistent diameter across the set
- Bulkier than steel plates for the same weight
- Premium price per pound versus iron

Fringe Sport Bella Bar
This is the bar we'd recommend when form actually matters, the whip and knurl combination, per the spec sheet and owner feedback, makes it easier to stay tight through the squat's bottom position.
- Excellent knurl-to-comfort balance
- Smooth, consistent spin under load
- Well suited to both squats and other barbell lifts
- Costs more than a basic gym bar
- Overkill if you only squat occasionally

Papababe Weightlifting Belt
Lifters still learning to breathe and brace consistently report that the immediate feedback against the belt helps the squat pattern click faster than cues alone.
- Affordable way to add bracing feedback
- Adjustable buckle fits a range of waist sizes
- Sturdy enough for moderate working weights
- Not built for max-effort powerlifting loads
- Break-in period before the leather softens

Fit Simplify Resistance Bands Set
Looping these around the knees before working sets is a widely recommended way to reinforce knee tracking, and owners often make them a permanent part of their squat warm-up routine.
- Multiple resistance levels in one set
- Small enough to keep right by the rack
- Useful beyond just squat warm-ups
- Bands wear out faster than steel gear
- Not a substitute for actual mobility work
How we chose
Our focus was on gear that's realistically used for squat training at home, not equipment meant strictly for commercial gyms. When it came to racks, we gave preference to J-hook and safety pin designs that owners report as stable during a genuine working set, rather than relying on spec-sheet claims alone. For bars, we compared knurl depth and sleeve spin based on what listings and owner reviews describe. Plates were assessed according to how owners say they hold up when a rep is missed and the weight drops, while accessories were evaluated based on whether lifters report a real difference in how the squat pattern feels. Pricing and availability were verified against current US Amazon listings, so everything included here is still in stock and not an import-only or discontinued product.
Barbell squat demonstration: setup to lockout
1. Bar position
Most people training at home tend to stick with a high-bar squat, placing the bar across the traps just above the rear deltoids. This setup keeps the torso more upright and carries over well to general strength and mobility work, making it an easier choice for beginners. In contrast, a low-bar position sits an inch or two lower, resting across the rear delts. This shifts more of the load onto the hips, allowing advanced lifters to handle heavier weights, though it requires greater shoulder mobility to get into position correctly.
2. Unracking and stance
Step back from the rack in two controlled steps, not five shuffling ones. Every extra step is fatigue spent before the set even starts. Feet should land just outside shoulder width with toes turned out slightly, somewhere between 15 and 30 degrees depending on hip structure. There’s no universal correct stance width. It’s whatever lets the knees track directly over the toes through the full range.
3. The descent
Initiate the squat by pushing the hips back slightly while bending the knees, rather than dropping straight down. Keep the chest up. Brace the core against a full breath, and let the knees track out in line with the toes rather than collapsing inward. Depth for general training purposes means the hip crease drops at least level with the top of the knee, often called parallel. Many lifters can and should go deeper if mobility allows.
4. The bottom and the drive out
At the bottom, there shouldn’t be a bounce or a pause that lets tension leak out. Drive back up by pushing the floor away through the whole foot, not just the heels, keeping the chest from collapsing forward. Full lockout means hips and knees fully extended, not hyperextended.
Common form breakdowns to watch for
- Knee valgus (caving in): usually a cue to actively push the knees out, sometimes reinforced with a light resistance band around the knees during warm-up sets.
- Excessive forward lean: often a mobility or bracing issue rather than a strength issue, check ankle mobility and core bracing before adding load.
- Rising hips first out of the bottom (“good morning squat”): a sign the weight is too heavy for current bracing, or that hip drive is outpacing leg drive.
- Losing the heel: weight shifting onto the toes usually means shoes with too much heel lift or ankle mobility that needs direct work.
The home-gym setup that supports a real barbell squat
Demonstrating good squat form is one thing. Practicing it safely at home for months is another, and that’s where the rack, bar, and plates actually matter. A rack with adjustable safety pins means a missed rep gets caught instead of dropped on you. Good knurl on the bar gives the upper back and hands something to grip through a heavy set. Bumper or rubber-coated plates protect both the floor and the rack uprights when a rep does get missed and dropped.
| Component | What to look for | Why it matters for squats |
|---|---|---|
| Rack or cage | Adjustable J-hooks and safety pins, tight hole spacing | Lets you unrack at the right height and catches failed reps |
| Barbell | 7-foot Olympic spec, moderate knurl depth | Grip and back comfort under a loaded bar for reps |
| Plates | Bumper or rubber-coated, consistent diameter | Protects floors and rack uprights on missed reps |
| Belt | Adjustable, sturdy buckle or lever | Gives bracing feedback, especially useful while learning form |
| Bands | Multiple resistance levels | Warm-up tool for hip and knee tracking before loaded sets |
Building the rest of the setup
If you’re assembling a full home gym around squat training rather than just adding a rack, our power racks hub breaks down cage sizing and safety-pin systems in more depth. The barbells and plates hub covers bar specs and plate materials beyond what fits here. A bench earns its keep for accessory work between squat sessions, and resistance bands are worth having on hand for the warm-up work mentioned above. For the day after a heavy squat session, check our recovery gear hub, which covers the tools that actually help with soreness in the quads and glutes.
Related guides
- Best power racks for a home gym
- Barbells and plates buying guide
- Best weight benches
- Resistance training gear
- Recovery tools and equipment
- Home gym setup guides
- How we rank equipment
- About TalkGyms
Ready to build your squat setup?
See current pricing on the power cage we'd start with.
Frequently asked questions
How deep should a barbell squat go?
For general strength training, aim for the hip crease dropping at least level with the top of the knee, often called parallel. Many lifters with adequate mobility can and should go deeper for full range of motion benefits.
Is high-bar or low-bar squat better for beginners?
High-bar is usually easier to learn first because it keeps the torso more upright and requires less shoulder mobility to set up. Low-bar can come later as hip-dominant strength and mobility develop.
Do I need a power rack to squat safely at home?
A rack with adjustable safety pins is strongly recommended once you’re squatting meaningful weight, since it catches a failed rep instead of leaving you stuck under the bar.
Why do my knees cave in during a squat?
Knee valgus is often a cue and awareness issue rather than a pure strength limitation. Actively pushing the knees out and using a light resistance band around the knees during warm-ups can help retrain the pattern.
What size barbell do I need for squats?
A standard 7-foot Olympic bar with 2-inch sleeves fits nearly all home racks, benches, and plates, and is the standard choice for back squats.
Should beginners wear a weightlifting belt?
A belt isn’t required early on, but many lifters find it useful for learning to brace the core properly under load, which reinforces good squat mechanics.
Are bumper plates necessary for home squat training?
They’re not strictly necessary, but rubber-coated or bumper plates protect floors and rack uprights significantly better than bare steel plates if a rep ever gets missed and dropped.
More Buying Guides
 Jump Rope Cardio Workout: The Ropes and Routines That Actually Deliver ResultsWhat Does a Mini Barbell Do? A Real-World Breakdown for Home Gyms
 Stairmaster vs. Elliptical: Which Cardio Machine Actually Fits Your Home Gym?How to Do the Ski Erg Correctly: Technique, Common Mistakes, and Setup Tips
 The Best Treadmills for a 30-Minute Home Workout in 2026
 Types of Dumbbells: Which Style Actually Fits Your Home Gym in 2026